Grow Room Design & Grow Room Setup
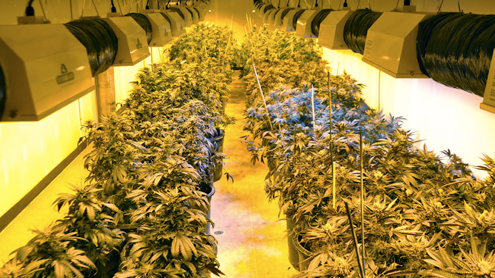
Now you’ve decided to be an indoor marijuana grower, your grow room setup is key to producing healthy blossoming plants. We’ll take you through the basics about marijuana grow rooms and give you advice on how to prepare your chosen growing space along with a step by step guide.
What preparation can I take before I build my grow room?
When it comes to choosing a grow space, there are a number of options for the indoor grower; basement, attic, spare bedroom, grow tent, closet grow, cabinet or even a PC. The same fundamental principles apply to each one. The basic needs of your plant are light and water, which means your grow room will either need to contain, or be very close to, both a water and electrical supply. The requirements plus the factors outlined below will help ensure successful marijuana grows for many years to come.
Grow tip: Draw your grow room design to scale before you build it, locating where light fans and exhaust vents, electrical supply and plants are going to go. Note where you are going to enter and where water is supplied from. These simple steps will help with your grow room setup and maximise your grow space.
Cleaning
It is important that your grow space is clean as dirt opens up your plants to pests and disease. It’s important to plan your grow room design before you start putting plants into the chosen space. Make sure the floor has been vacuumed and the walls have been scrubbed and disinfected. Remove any carpeting or fabrics as these harbor mold, dust and mites.
Flooring
When planning your grow room setup, the floor of your grow space should be hard and easy to wipe or mop. As stated in cleaning, remove any carpet or fabrics you may have on the floor. Make sure you place your plant containers in trays if you’re using soil, as this will capture any spillages that are likely to occur during watering.
Reflective surfaces in a grow room setup
Reflective surfaces help your plants get as much light as possible, increasing the size and overall yield of your crop. There are a number of options available;
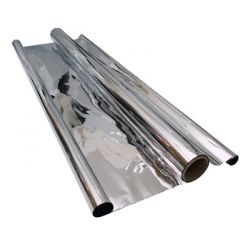
• Mylar – Mylar reflects up to 97% of the light making it one of the most reflective materials available. It comes in multiple formats, so if you choose mylar make sure you buy the type that is aluminized. Attach to your wall with tape or tacks, covering tacks with a little bit of tape to help prevent tears. Mylar can be an expensive choice so get the most out of your mylar by hanging it flat against the wall and keeping it clean.
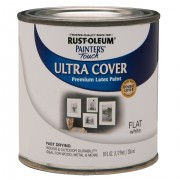
• Flat white paint – Matt flat white paint is a great option for people looking to save money while still reflecting large amounts of light. It contains little to no light absorbing properties and reflects up to 85% of light while creating absolutely no hotspots. Surfaces painted with flat white are easy to keep clean.
• Emergency blankets – Emergency blankets are cheap and easily available from camping shops. Reflecting only 70% of light, they are not as efficient as mylar or flat white paint, but they are good to use in smaller spaces like small cabinets or PC grows. Make sure you hang them flat against the wall of your grow space as crinkles will waste light and will also cause hot spots which are damaging to your plant.
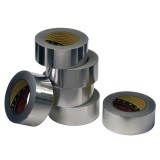
• Foil – If you are thinking of using foil, don’t. Foil only reflects 55% of light and is difficult to keep flat. Crinkles in your foil actually reflect light away and cause hot spots which can damage and burn your plant. Its creation of hotspots and its conductivity of electricity actually make foil a fire hazard. DO NOT USE FOIL!
Light Leaks

Air Ventilation
Keeping fresh air circulating through your room supplies your plants with the CO2 it needs for healthy growth and helps to maintain a steady atmosphere for your plants to thrive in. When building your grow room, make sure you have considered how much air your plants are going to need. A good exhaust fan situated towards the top of the room will help pull plenty of air through. Decent odour control will help to keep your room subtle and avoid detection from nosey neighbours.
Grow tip: Good odor control is key to good grow room design. Fitting your exhaust fan with a carbon filter will ensure you’re not pumping the smell of weed out into your community. Also, by placing a deodorizer like ONA gel in the corner of the room, you can keep the odor down.
Temperature and Humidity
The correct temperature and humidity in your grow room setup are important to a healthy grow and an unstressed plant (it is common for stressed plants to become a hermaphrodite and produce smaller yields.) Fitting your grow room with a digital thermometer and hygrometer (for humidity) are great ways for you to keep a consistent growing environment.
Step By Step – Grow room setup
Step 1 – Select the space where you are going to put your plants, it might be a spare bedroom, a basement or a grow closet. Spend some time creating a good grow room design that works for you and plan the layout. This will help you work out what you’re going to need and how much bud you will be able to produce.
Step 2 – Clear everything out of the space. Chairs, curtains, carpets, clothes and other obstacles not only restrict access to your plants, but are also great places for mold and pests to gather. Your grow room or space needs to be disinfected and spotless before you start construction.
Step 3 – Enclose the room making sure no light can get in. If your space has a window, block it up from the inside, using either a blind or curtain you later seal off. You don’t want people looking in!
Step 4 – Cover the walls, ceiling and floor with a highly reflective material. By doing this you increase the amount of light you give to your plants.
Step 5 – Set up a ventilation and exhaust fan as using both creates good air circulation throughout your grow room. See our odour control and air ventilation section for more information.
Step 6 – Ensure that your grow room is either supplied or easily supplied with water. The larger your grow room, the more important it is to have a water supply actually within it.
Step 7 – Hang your lights and fit your ballast. Try to attach your lights to the ceiling of your space using an adjustable connection. This will enable you to keep your lights the correct distance away from the plants at all times of their life cycle.
Step 8 – Fit any extra tools you may be using, i.e humidity meter, thermometer, pH meter, etc. Although they are not crucial, these will help you diagnose any problems with your plants as soon as they start to look unhealthy.
Step 9 – Set up your containers. At this stage soil will be easier to set up than hydroponics as there is far less work. Follow the manufacturer’s instructions when building your hydroponic set up.
Step 10 – Plant your germinated seeds, seedling or clones in your grow room. Your weed should be ready to harvest in 12-18 weeks.
Grow tip: if you visit your grow room in the period of darkness, fit a green light bulb as the green light spectrum is not visable to the plant and will not cause the plant stress.
Making sure you get your grow room design right from the start will help maximize the potential of your grow room setup. Whether you’re growing in a large room or a grow closet it’s important your grow room works for you.


I used cardboard walls to support the mylar with wood slats and foil tape to seal the gaps and a plastic sheet as the floor to prevent water leakage only cost me 30$
Nice article, I would like to point out thou that most people who have not grown before think follow the best step by step process will yield the best plants, but in fact, growing is an ART. Like any art, you have to practice it before you get really good at it.
You can transform the walls of your grow room into a permanent air ionization system. Eliminating any potential contamination from Powdery Mildew-Botrytis-Gray Mold-Bacteria-Viruses-Mold Spores. Simply mix the ionic paint additive with interior house paint and apply the blended mixture to the walls of your grow room. One application produces 139.600 Anion Output Per Cubic Centimeter, your plants will produce greater yields and your employees will have a healthy environment to work in. http://ioicpaint.com
Thanks 😀
Great info, great tips.
I found information and tips very helpful.
Thanks for sharing!
I’m very pleased to discover this site. I need to to thank you for ones time for this particularly wonderful read!!
I definitely savored every bit of it and I have you book marked to
check out new things on your site.
How to use co2 and how much and how many times do you need to use
question???how many plants can i grow in 6 square meter?tnx
Wow.. No offense at all but do some due diligence and just Google all the Qs below. You want the best possible setup you can afford. Diy…if you want to save a few hundred dollars on what any seller has “top of the line” whatever but it’s not even close. I make a hydro setup I’ve perfected a 30 (thirty) gallon black container with lid, holes, and 6 sites which is 5 gallons per plant, you can’t ask for a plug snd, 6 (5 gallons for each plant is huge) ~ 3.75″ mesh cups, ect ect easy water/nuits ct. Trust me it’s by far the the best possible hydro system for HUGE Yeilds. Again Google Dwc (deep water culture) COMPLETE Hydro setup with nothing but the best possible hydro system “complete” setups that I half (reated after realizing that every single..complete hydro system that is the best actually sucks and it’s a P&L technique. Simply putbI make a select few of my friends far superior hydro master of Massachusetts and yes I’m Irish and from Boston. Wicked awesome.. I know.
Thank you a lot for sharing this with all folks you actually realize what you are speaking about!
Bookmarked. Kindly additionally talk over with my web site =).
We could have a link exchange arrangement among us
hello!,I love your writing so much! percentage we be in contact
extra approximately your article on AOL? I require a specialist on this area
to resolve my problem. Maybe that’s you! Having a look forward to look you.
Thank you a bunch for sharing this with all folks you really realize what
you’re talking about! Bookmarked. Please also visit my site
=). We can have a hyperlink alternate contract between us
As anyone with any clue about growing would know. You should never use a mirror,never.They cause the light to hit the plants unevenly ,which causes hotspots and they will burn your buds.bit like using a magnifying glass to start fire.It’s not expensive to buy white visqueen plastic.£5 a metre from a grow shop.Hope this helps,happy growing
does it matter what kind of water you use? cause where I’m from our main water supply is from the ocean which goes through the water plant, which have bits of salt & chlorine would this be harmful to the plants?…do I need fresh rain water?
6 1/2 foot cube and I have 10 hp fan exhale and the same inhale 2 one foot bags co2 just want to know the best inexpsive lighting to buy and do I have to cool that with a fan system
Hi
Really helpful site, thank you. I was wondering if there were any grow lights out there as good as HPS but don’t take up as much electricity? Don’t want to be raising suspicions with a spike in my usage. I only want to grow 2 plants in an old wardrobe or cupboard.
Is a box that is 3 feet tall and about 18″x12.5″ enough space to grow? How much would I yield?
I?m wondering if white sheets will be good reflectors?
I have a 8 square Ft closet how many plants could I grow at one time
What is the correct temperature for weed to grow?
Thank you for the useful Info!
hi
thanks for your useful website.
I want to know what is the suitable temperature and humidity for growing room and what the best size container to plant in and how far apart the containers should be.
thanks for your help.
In reference to my last question…I guess I would need also to know what size container to plant them in, how far apart the containers should be, and would it be one plant per container? Sorry if this sounds like dumb questions, but I’m new at this and I want to get it right the first time. Thanks.
I’ve set aside a 10′ x 6′ corner of my shed. I already have two 4′ (2 bulb) fluorescent fixtures with grow lights. I wanted to buy a 400 watt grow light to suspend from the ceiling, and mount the two fluorescent fixtures on tri-pods on each side, facing in towards the plants. I was wanting to grow an auto-flowering strain such as Big Bud. How many plants could I expect to grow under this light? Also, would a 600 watt grow light use that much more electricity, and if not, how many more plants could I get with a 600 watt light and the two fluorescents?
In terms of size it sounds like it could work fine. It will also be good for preventing light leaks, which can sometimes can be an issue with other grow room setups. It’s important you give it a real good clean before you start though. Good luck
Question here. I have an old cistern on my property. Its eight feet around and 23 feet deep. Would this be an OK site for a grow space. Its really comfortable temperature wise, year round, and humidity is constant too.
Glory to God
My questions this time are about humidity, temperature, and flushing toward harvest.
During the summer rainy season humidity will go up to 30, 40, and finally up to 50%, but until then it’ll stay at about 20% pretty consistently. Is this likely to be a problem? There might be room for a small humidifier in my 2 1/2 x 3-foot grow space, with six plants at most in veg, but would the steam be likely to damage my 250-watt HIDs? What percent humidity is optimal?
Experimenting with my lights I find that it’s easy to keep temperatures around 75-80 Fahrenheit, at least as we move toward winter. But I keep my home fairly cool, so at night room temperatures drop to around 58-62, and that’s what I’ll have in the grow space when the lights are off. Would that be a problem?
I’ve read that you should flush the plants with plain water during the two weeks before harvest. Trichomes start off clear, then turn cloudy, and finally turn to amber. How long does this process take? I want an uplifting rather than a stony high, so (if I understand correctly) I would want them to be mostly cloudy, but how do I know when to start flushing?
Thanks
You could use a mirror, any surface that reflects light can be used, naturally some will work better than others.
What about mirror? they should reflect the 90% of the light, as far as I know, is there any risk using old mirrors?
Realistically you’d be looking at between 4-6 plants maximum. It does however depend on the type of marijuana plants or strain genetics you are growing as some will be bushy (indica strains) and others taller and thinner (sativa strains). As a general rule the strains need space to branch out so my suggestion would be 4 would be your limit.
Question: How many plants can I reasonably expect to grow in a 2 ½ x 3 foot space under one 250-watt bulb?
I’ll describe the space just for fun.
I have cats. So to protect the plants I built a 28 x 38 inch framework in the corner of a room next, to a window. The two open sides are covered with chicken wire.
For reflectivity, the two walls and the one long open side are covered, from the floor to about 36 inches, with scraps of foam insulation, which has a shiny surface on one side. The short chicken wire side is a removable access. The bottom two feet are open, with a fan on the outside; above that I reflective material for about 18 inches.
I have one 250-watt Sunleaves ballast, one MH and one HPS.
What would you recommend? Four plants? Six? Could there be more during vegetation?
Thanks.
THANK YOU FOR THIS INFORMATION, THERE ARE THINGS THAT I DID NOT THINK ABOUT WITH MAKEING A GROW ROOM AND THERE ARE MORE PREPS. THAT I NEED TO MAKE TO MAKE THIS HAPPEN.
THANK YOU RICK